
TriCore/AURIX
Where Safety Meets Performance
Versions
Release Notes
Release Note - v6.3r1p8 Product Enhancements Summary (Build 23112758)
Release Note - v6.3r1p7 Product Enhancements Summary (Build 22123104)
Release Note - v6.3r1p6 Product Enhancements Summary (Build 22081062)
Release Note - v6.3r1p5 Product Enhancements Summary (Build 21092262) updated 12-02-2024
Release Note - v6.3r1p4 Product Enhancements Summary (Build 21041358)
Release Note - v6.3r1p3 Product Enhancements Summary (Build 20080452)
Release Note - v6.3r1p2 Product Enhancements Summary (Build 20061357)
Release Note - v6.3r1p1 Product Enhancements Summary (Build 19073034)
Release Note - v6.3r1 Product Enhancements Summary (Build 19041558)
Documentation
User Guide - v6.3r1 TriCore C Compiler
Getting Started Guide - v6.3r1 VX-toolset for TriCore
User Guide - v6.3r1 Scripting Debugger
User Guide - v6.3r1 Pin Mapper for AURIX
User Guide - v6.3r1 C Compiler for MCS (GTM)
User Guide - v6.3r1 C Compiler for HSM
Downloads
Release Notes
Release Note - v6.2r2p5 Product Enhancements Summary (Build 20090177)
Release Note - v6.2r2p4 Product Enhancements Summary (Build 19053136)
Release Note - v6.2r2p3 Product Enhancements Summary (Build 19032145)
Release Note - v6.2r2p2 Product Enhancements Summary (Build Build 18101764)
Release Note - v6.2r2p1 Product Enhancements Summary (Build 18062233)
Release Note - v6.2r2 Product Enhancements Summary (build 18041957)
Release Note - v6.2r1p4 Product Enhancements Summary (Build 17120545)
Release Note - v6.2r1 Product Enhancements Summary (Build 17012451) updated 01-03-2017
Documentation
User Guide - v6.2r2 TriCore C Compiler
Getting Started Guide - v6.2r2 VX-toolset for TriCore
User Guide - v6.2r2 Scripting Debugger
User Guide - v6.2r2 Pin Mapper for AURIX
User Guide - v6.2r2 Configuration of Infineon iLLD Drivers
User Guide - v6.2r2 TASKING Real-Time Operating System
User Guide - v6.2r2 C Compiler for MCS (GTM)
User Guide - v6.2r2 C Compiler for HSM
User Guide - v6.2r2 C Compiler for XC800 (SCR)
User Guide - v6.2r2 C Compiler for PCP
Downloads
Release Notes
Release Notes - v6.1r1 Product Enhancements Summary (Build 16092940) updated 24-10-2016
Documentation
User Guide - v6.1 TriCore C Compiler
Getting Started Guide - v6.1 VX-toolset for TriCore
User Guide - v6.1 Scripting Debugger
User Guide - v6.1 Pin Mapper for AURIX
User Guide - v6.1 Configuration of Infineon iLLD Drivers
User Guide - v6.1 TASKING Real-Time Operating System
User Guide - v6.1 C Compiler for MCS (GTM)
User Guide - v6.1 C Compiler for HSM
Release Notes
Release Notes - v6.0r1p2 Product Enhancements Summary
Documentation
User Guide - v6.0r1 TriCore C Compiler
Getting Started Guide - v6.0 VX-toolset for TriCore
User Guide - v6.0 Scripting Debugger
User Guide - v6.0 Pin Mapper for AURIX
User Guide - v6.0 Configuration of Infineon iLLD Drivers
User Guide - v6.0 TASKING Real-Time Operating System
User Guide - v6.0 C Compiler for MCS (GTM)
User Guide - v6.0 C Compiler for HSM
Release Notes
Release Notes - v5.0r2p4 Product Enhancements Summary
Release Notes - v5.0r2p3 Product Enhancements Summary
Release Notes - v5.0r2 Product Enhancements Summary
Release Notes
Release Notes
Release Notes
| Download | Date | Size | Description |
|---|---|---|---|
| How to migrate from BIFACES to TASKING IDE.pdf | October 2019 | 3 MB |
Application Note: How to migrate from BIFACES to TASKING IDE The Build and Integration Framework for Automotive Controller Embedded Software (BIFACES) from Infineon, is an internally developed build framework for Infineon automotive micro-controllers' software development. This application note describes how you can migrate a project created with Infineon's BIFACES to the TASKING VX-toolset for TriCore IDE. |
| Stacks and Stack Size Estimation in the TASKING VX-toolset for TriCore.pdf | May 2019 | 1 MB |
Application Note: Stacks and stack size estimation in the TASKING VX-toolset for TriCore The TriCore architecture defines two stacks: the user stack (ustack) and the interrupt stack (istack). Several TriCore devices have more than one TriCore core, each of which has its own pair of ustack and istack. In the TASKING VXtoolset for TriCore version v6.2r2 or older, the stack usage is calculated for a single stack for all cores. From TriCore toolset version v6.3r1 it is possible to calculate the stack usage for interrupt handlers and the stack usage for each core separately, which is described in this APP-note in more detail. |
| GCC to TASKING Migration Guide for Infineon AURIX.pdf | March 2019 | 1 MB |
Application Note: GCC to TASKING migration guide for Infineon AURIX This migration guide describes the porting of an AURIX/TriCore software project built with GCC to the TASKING toolset. It covers the changes to be made to the C/C++ source code, the assembly source code, the startup code, and the linker script file.
|
| TriCore Alignment Requirements.pdf | March 2019 | 735 KB |
Application Note: Alignment requirements The TriCore architecture comprises some constraints related to the alignment of certain data types, structs and struct members. This APP-note describes several alignment related topics.
|
| How to Mitigate the TASKING TriCore Tools Linker Error E121.pdf | March 2019 | 739 KB |
Application Note: How to mitigate the TASKING TriCore tools Linker error E121 This application note explains the most common reasons for E121 linker errors and how they can be mitigated.
|
| How to build your iLLD application with TASKING VX-toolset for TriCore.pdf | Feb 2019 | 1 MB |
How to build your iLLD application with TASKING VX-toolset for TriCore This application note describes how you can use the Low Level Driver library (iLLD) from Infineon together with the TASKING VX-toolset for TriCore to access and configure the integrated peripherals of Infineon TriCore derivatives.
Note: The iLLD sources and examples are available for download from the Infineon website. |
| TASKING TriCore tools Linker tips & tricks.pdf | Apr 2018 | 1 MB |
Linker Script Language (LSL) Tips & Tricks for TASKING TriCore Toolset This application note provides several helpful tips and tricks to help you benefit from the opportunities that LSL provides
|
| Jan 2009 |
Starter Kit TC1796 for TASKING TriCore VX-toolset v2.3r1 |
||
| Jan 2009 |
Starter Kit TC1766 for TASKING TriCore VX-toolset v2.3r1 |
||
| Jan 2009 |
Starter Kit TC1130 for TASKING TriCore VX-toolset v2.3r1 |
||
| Mar 2005 |
LSL Sample Cases using Control Program Demonstration of the usage of the Linker Script Language while using the TriCore toolchain to locate your application. It contains examples that deal with the most commonly used aspects of the language. |
||
| Mar 2005 |
LSL Sample Cases using EDE Demonstration of the usage of the EDE's Script File page while using the TriCore toolchain to locate your application. It contains examples that deal with the most commonly used locating aspects. |
||
| Apr 2002 |
Application Note: Setting Locator Options (v1.4r1 & v1.5r1) This application note shows how the locator controls influence the locating process. It is intended both for EDE and command line tools users. After reading, the user should be able to configure the locating process and resolve possible errors that may result from applied settings and controls. |
||
| Apr 2002 |
Application Note: The saturate type qualifier and integral types This application note covers all aspects of using saturation with integral types. |
This page contains TriCore tips & tricks from our customer support staff.
Eclipse
- After updating Java JRE or installing SmartCode, Eclipse does not start but quits with an error. How to solve this?
- Do the Eclipse based TASKING products work with OpenJDK?
- Show help on tool errors
- Does the Eclipse based TriCore toolset v6.3r1 work with the Amazon Corretto distribution of OpenJDK?
- Can I see the command line invocations of all executed tools during a build?
Compiler
Linker
- Why do I get Linker warning W132: cannot bind symbol _lc_ub_heap … and cannot bind symbol _lc_ue_heap … after upgrading to v6.3r1?
- Why is the user stack size calculation in the map file showing zero sized stacks after upgrading to v6.3r1?
- I am using the C startup code included in v6.3r1 with a customized derivative.lsl file from an older version of the toolset. The linker generates the warning: ltc W132: cannot bind symbol _lc_ub_ustack.
Debugger
- My application does not start on a target board after the Program Flash memory was erased. How can I solve this problem?
- After stepping into a function while debugging, how can I return quickly?
- When my application is fully located in RAM memory, the TASKING debugger fails to download it and run it on the target. The debugger issues an error “Loading failed: A problem occurred during downloading”. What’s the reason for this error?
Eclipse
After updating Java JRE or installing SmartCode, Eclipse does not start but quits with an error. How to solve this?
After updating Java JRE the following Eclipse error may show up:
| An error has occured. See the log file <workspace>\.metadata\.log. |
The log file shows a line like:
Caused by: java.lang.IllegalArgumentException: Invalid version number: Version number may be negative or greater than 255
To mitigate, install a previous JRE like version 202 which can be downloaded from here and use one the following options:
- Modify the eclipse.ini file which is included in the \eclipse subfolder of the TASKING tools installation directory. Add the following two lines at the beginning of eclipse.ini:
-vm
C:\Program Files (x86)\Java\jre1.8.0_202\bin\javaw.exe - Or adapt the shortcut which starts the Eclipse executable and modify the Target by adding option:
-vm "C:\Program Files (x86)\Java\jre1.8.0_202\bin\javaw.exe"
Do the Eclipse based TASKING products work with OpenJDK?
Yes. You can use the free OpenJDK 8 with our TASKING products that use the Eclipse platform v4.5.1 (Mars 1). These are the TASKING VX-toolset for TriCore versions v6.1r1 and higher, GTM v3.2r1 and higher and TASKING Embedded Debugger v1.0r3 and higher.
Eclipse requires that you have some Java virtual machine (JVM) installed. 64-bit Eclipse requires a 64-bit JVM, and a 32-bit Eclipse requires a 32-bit JVM. You may either install a Java Runtime Environment (JRE), or a Java Development Kit (JDK). Currently we ship the free Oracle JRE with our products. Oracle JRE 1.8 (before April 2019 update) will stay for free. For newer versions Oracle charges a license fee. Instead of installing the Oracle JRE, you can use the free OpenJDK 8. For example, you can use OpenJDK 8 (LTS) from https://adoptopenjdk.net/.
If you have installed Eclipse Mars 2 yourself and use the TASKING VX-toolset for TriCore as a plugin (only possible for v6.3r1), you can also use higher versions than OpenJDK 8.
After installation of the OpenJDK, make sure that the OpenJDK is your default JVM. Otherwise you need to update the file eclipse.ini in the eclipse directory of the product to point to the correct JVM. See https://wiki.eclipse.org/
Our future products will ship with a free OpenJDK.
Show help on tool errors
When you encounter errors and/or warnings, they are displayed in the Problems view in Eclipse. If you want to get more details/information about errors/warnings that are encountered during the build process, right-click on an error or warning in the Problems view and select Detailed Diagnostics Info. A message box will appear with more details about the error or warning.
In a command prompt you can use the option --diag=<error number> on a specific tool. For example:
ctc --diag=207
E207: syntax error - token "<token>" deleted
The compiler detected a syntax error caused by an unexpected token. The token was removed in an attempt to recover.
Does the Eclipse based TriCore toolset v6.3r1 work with the Amazon Corretto distribution of OpenJDK?
Yes, the 64-bit version of Amazon Corretto has been tested successfully with TriCore toolset v6.3r1. Also, the 32-bit version of Amazon Corretto JRE8 can be used for the 32-bit versions of the TASKING TriCore tools (versions up to v6.2r2) which are JRE8 compliant.
To force Eclipse using Corretto JRE you can update file eclipse.ini located in the sub-directory ctc\eclipse of the tools and add the following two lines at the top of the ini file:
 -vm
<path to the Amazon Corretto JRE 8 install>\bin\javaw.exe
Can I see the command line invocations of all executed tools during a build?
To view all tool invocations during a build in the Console view of Eclipse, open dialog Project | Properties | C/C++ Build | Settings | Global Options, enable option Verbose mode of control program and rebuild your application or file. From the command line, use control program option --verbose (or simply -v) like:
cctc --verbose test.c
Compiler
How can I minimize the impact of turning off a particular optimization?
Enabling and disabling optimizations for the complete project or one of its modules can have significant consequences. With the #pragma optimize instructions you are able to selectively enable/disable specific optimizations at source level, and obtain more fine-tuned result.
#pragma optimize [flags] Controls the amount of optimization. The remainder of the source line is scanned for option characters, which are processed like the flags of the -O command line option.
#pragma optimize restore End a region that was optimized with a #pragma optimize. The pragma optimize restore restores the situation as it was before the corresponding pragma optimize. #pragma optimize/optimize restore pairs can be nested.
EXAMPLE:
#pragma optimize Y
[code]
#pragma optimize restore
In this example, the peephole optimization is turned off for the code that's between the #pragma optimize instructions.
What should I do when I encounter a system error such as S900 internal consistency check failed - please report?
System errors such as S900, S903, S911, S917 indicate an internal problem of the C compiler. There is a good chance this is caused by a problem of a certain C compiler optimization. Thus disabling this optimization might be a possible mitigation. To determine whether an optimization causes the problem you can follow these steps:
1. Disable all optimizations by specifying C compiler option -O0, or by adding the following pragma at the beginning of the affected C source file:
#pragma optimize 0
2. If the S9xx error disappears after this change, you can do further tests to determine which optimization exactly causes the problem. You can first try to enable some optimizations, by specifying -O1, or by adding the following pragma at the beginning of the affected C source file:
#pragma optimize 1
3. If the problem still doesn't show up you can try option -O2, or add the following pragma at the beginning of the affected C source file:
#pragma optimize 2
4. When the problem does show up you need to compare the compiler optimizations settings between the working and non working version. Then you can continue to locate the single optimization that causes the problem, by switching off individual optimizations. For example, use -OF or use
#pragma optimize F
to disable the control flow optimization.
Hint: you can control these Compiler optimization options from Eclipse GUI as well, see section 4.6. "Compiler Optimizations" from the User Guide ctc_user_guide.pdf.
5. If switching off an optimization does not solve the problem, our TASKING support staff needs a preprocessed version of the affected C source code plus the C compiler options you are using for further investigation. You can create this by adding the option -ECp to the C compiler options. Then a preprocessed file will be created instead of a .src file for the assembler.
Note that even if you did find a mitigation, we encourage you to send this preprocessed C source file, so that we can find out if this is a known issue or a new one. Because almost all S9xx errors will be fixed in an upcoming release.
Linker
Why do I get Linker warning W132: cannot bind symbol _lc_ub_heap … and cannot bind symbol _lc_ue_heap … after upgrading to v6.3r1?
The cause of these warnings is that the heap definition was moved from tc_mc_arch.lsl to the file derivative.lsl to support core specific LSL files where each core has its own heap. The file tc_mc_arch.lsl file is included by derivative.lsl.
When the project uses a (customized) derivative.lsl from an older version you can mitigate the issue as follows:
- Either: copy the file tc_mc_arch.lsl included in the ctc\include.lsl subfolder of the older TriCore toolset version to the same folder which includes the file derivative.lsl your project uses. Then the heap definition is included again.
- Or: add the following entries to the file derivative.lsl your project uses:
#ifndef HEAP
#define HEAP  16k  /* heap size */
#endif
section_setup :vtc:linear
{
    heap "heap"
    (
        min_size = (HEAP),
        fixed,
        align = 8
    );
}
Why is the user stack size calculation in the map file showing zero sized stacks after upgrading to v6.3r1?
In v6.3r1 the 'entry_points' keyword was introduced to allow the specification of different entry points for the stack size calculation. In case you are using a customized derivative.lsl from an older TriCore toolset version in your project, you need to add the default 'entry_points' entry for core 0 to that file.
// macro definition added
#define __USTACK0_ENTRY_POINTS_ATTRIBUTE ,entry_points=["_START"]

section_setup :tc0:linear
{
    stack "ustack_tc0"
    (
        min_size = (USTACK_TC0),
        fixed,
        align = 8
        // macro added to the core 0 user stack section
        __USTACK0_ENTRY_POINTS_ATTRIBUTE
    );
I am using the C startup code included in v6.3r1 with a customized derivative.lsl file from an older version of the toolset. The linker generates the warning: ltc W132: cannot bind symbol _lc_ub_ustack.
The C startup code included in v6.3r1 refers to the linker label _lc_ub_ustack which indicates the start address of the user stack for core 0. You can add this label to the customized derivative.lsl as follows:
section_layout :tc0:linear
{
    //added for TriCore tools v6.3r1 compliance
    "_lc_ub_ustack" := "_lc_ub_ustack_tc0"; /* common cstart interface for first or single core */
    "_lc_ue_ustack" := "_lc_ue_ustack_tc0"; /* common cstart interface for first or single core */
    "_lc_ue_istack" := "_lc_ue_istack_tc0"; /* common cstart interface for first or single core */
}
An alternative approach is to use the C startup code of the older version instead.
Debugger
My application does not start on a target board after the Program Flash memory was erased. How can I solve this problem?
What probably happened is that during the erase memory command, the Boot Mode Header (BMHD) was also cleared. This is the case for TriCore 2xx devices where the Boot ROM is part of the Program Memory Unit. For TriCore 3xx devices, the Boot ROM is located in another part of memory and will stay untouched when you clear the Program Memory.
Normally, the Boot Mode Header on a target board is initialized by factory default to run the target stand-alone. When you flash an application using the TASKING debugger, without any Boot Mode Header configuration, you can disconnect the target board from the debug system and after a reset the application will start just as it went in the debugger. If however the Program Memory was erased, the Boot Mode Header could be unavailable and your application does not run stand-alone on the target board.
To solve this problem, you need to initialize a Boot Mode Header for your target. But be careful, you need to know what you are doing, because wrong use of the Boot Mode Headers might brick the device. Therefore, we advice you to first read chapter 4 TC29x BootROM Content of the AURIX™ TC29x B-Step User's Manual, or similar chapter in the User's Manual for other devices. Also read sections 7.9.13 Boot Mode Headers, and section 9.7.1. Boot Mode Headers in the TriCore User Guide.
To initialize the Boot Mode Header using Eclipse:
- From the Project menu, select Properties -> C/C++ Build -> Memory, and open the Boot Mode Headers tab.
- In Boot Mode Header 0, from the Boot Mode Header configuration, select Generate Boot Mode Header.
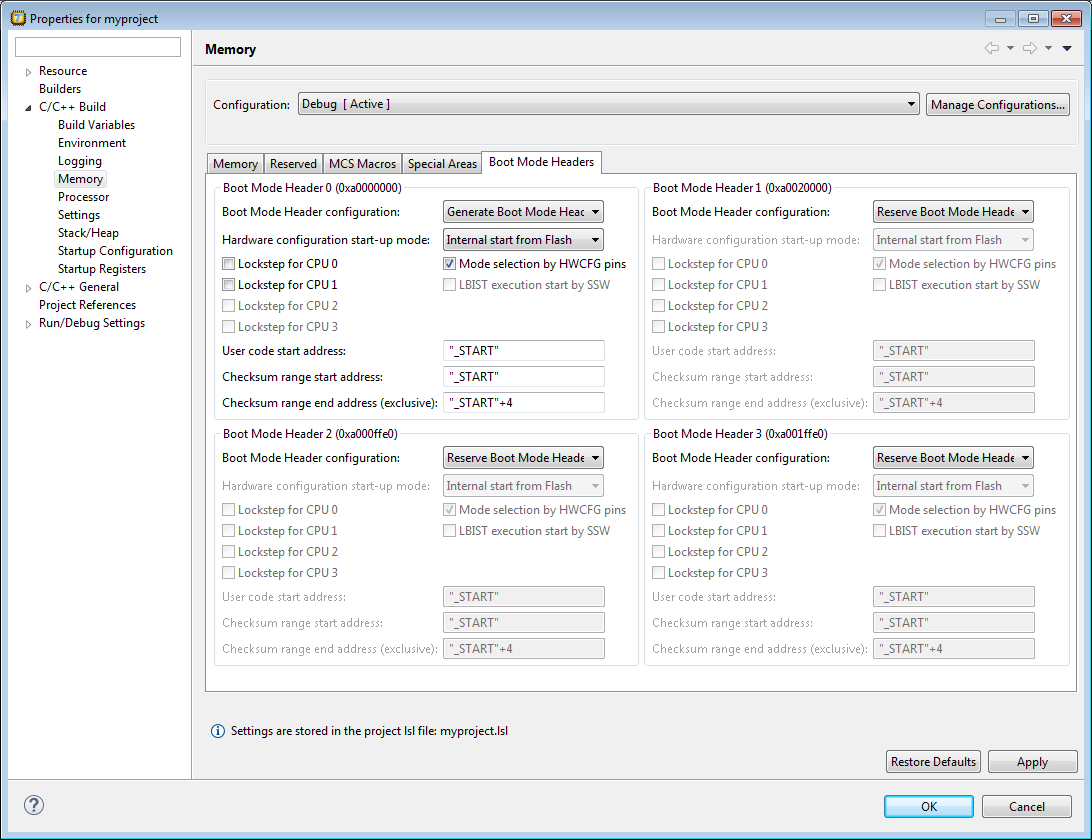
- Leave the other default settings untouched and select OK.
This will initialize the Boot Mode Header to allow for stand-alone execution of the target.
After stepping into a function while debugging, how can I return quickly?
If you (accidentally) step into a function, you can return to the higher level by selecting the Run | Return from Function menu item.
When my application is fully located in RAM memory, the TASKING debugger fails to download it and run it on the target. The debugger issues an error “Loading failed: A problem occurred during downloading”. What’s the reason for this error?
Parts of internal memory gets cleared at power-on and soft-reset automatically due to security reasons of the TriCore/AURIX microcontroller. This can be prevented by setting bitfield RAMIN from register UCB_DFLASH to “Don't init RAM after power on reset”. This requires a 3rd party flash tool like the free memtool from Infineon. After setting this bitfield, the application can be loaded and run from RAM successfully using the TASKING debugger.
| Item | File/Notes |
|---|---|
| Infineon miniWiggler | Debugger driver The Infineon DAS driver for the miniWiggler are available from the TASKING site:
Infineon may make newer versions available on their own website. Please understand that these newer versions may not work with your toolset version though, so it is advised to keep a backup copy of your existing installation upon trying a new version.
|